Pages

Saturday, October 27, 2012

Stitch Saturday

For a while now I've been doing a "Block of the Month" for Stitches magazine and I thought it would be nice to share some of them here.


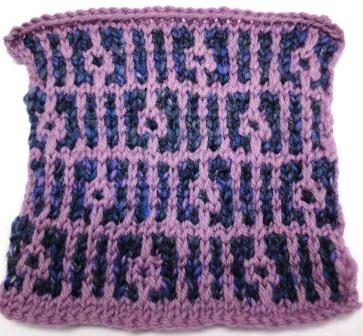
Slip Stitch / Mosaic Knitting

This method of knitting allows you to have more than one colour in a row but work with each colour separately. This means that one colour at a time is used by working the stitches in that colour and slipping the other stitches purl wise. Each row is only completed once all the colours in that row have been worked. Using contrasting colours works best.

The patterns for this type of knitting are usually charted with the black squares representing your darker yarn and the white squares your lighter yarn. A column of squares, usually on the right hand side of the chart indicates the colour yarn to be used in each row.  The rows are numbered on both sides, odd numbers on the right and even numbers on the left. You will notice that each row is numbered twice, this is because each is worked twice, first from the right, following the stitch pattern on the chart and then from the left working the same stitches again.

You will need
Yarn of your choice – one light colour and one dark colour
Knitting needles to suit your yarn

Instructions
The pattern worked here repeats over 10 stitches and 24 rows.
Using your light colour; cast on a multiple of 10 stitches and work in stocking stitch. Work 2 rows then continue repeating the charted pattern as many times as is necessary until you have knit a square. Cast off with your light colour.

If you prefer, cast on 2 extra stitches which will be worked as edge stitches on each row in your light colour.


24


23


22


21


20


19


18


17


16


15


14


13


12


11


10


9


8


7


6


5


4


3


2


1


Enjoy!

Monday, October 22, 2012

My "New" Studio

It's been chaos here in my normally peaceful neck of the woods, a few weeks ago we had a hail storm that lasted all night and the weight on my studio roof seperated the the roof sheets from the nails and so the water poured in. I was very lucky though - everywhere it leaked wet only the floor, missing all the important stuff like books, yarn, fabric, furniture ... some one was looking out for me :) anyway, I had to move out while it all got fixed and so I took the opportunity to get the walls painted and some new shelves put up and a new desk.. now I'm all reinstalled in what feels like a brand new space and I love it!

The veiw from my desk - looking in to my top space

 
Where all the yarn gets dyed
more workspace in my top space

my bottom space

for whatever reason, this photo will not load upright!


Monday, August 27, 2012

What a Lovely Day - Make some Felt Beads!

August is usually my worst time of year, cold and very dry here in our corner of the world and dusty and windy,! I usually have dust induced sniffles and end up feeling very sorry for myself. Well this year hasn't been so bad. We had snow 2 weeks ago and then went straight to summer, the last couple of days have been in the high 20's C  and when I woke up this morning it smelled like rain. The sun is shining and it's warm outside but if I look out to the south there are clouds building so you never know, we may be lucky :)

Today I have taken the dye pots out again and I'm busy dying wool tops for felting. All of a sudden it's what every one wants. I love felting too and am busy with a felted project for the December issue of Stitches. I thought I'd post a tutorial on making felted beads here today.


Felted Beads
©Dana Biddle

 We’ve made a necklace using felted beads before but here is a different way to make them. Most methods of making felt involve a fair amount of work but this way uses your tumble dryer to do the work for you.

 What you’ll need
Wool tops – available from ColourSpun
Good kitchen scale
Old stocking or pantyhose
Elastic bands
A bowl of hot water (not too hot – you’ll be putting your hands in it)
Dish washing liquid
Tumble Dryer
Beading needle
Beading thread (dental floss works well too)
Other beads
indings

Instructions

1.      To make beads of equal size, divide the dry wool into portions of equal weight. You will need 6 x 3g, 6 x 2g and 6 x 1g.

2.      Take a portion of wool; wrap it around itself to form a bead shape

3.      Carefully place the wool into the stocking; holding the bead in shape, pull the stocking tight around it and twist a couple of times, secure it in place with an elastic band

4.      Repeat step 2 and 3 for all the beads

5.      Fill a bowl with hot water and add a couple of drops of dishwashing liquid.

6.       Wet the beads in hot water; make sure that the wool is wet all the way through.

7.       Squeeze out excess water

8.      Place the stocking full of beads in the tumble drier for about half an hour

9.      Check if the beads have felted enough by feeling how hard they are. If necessary, repeat steps 5 to 8 once more

10.   Remove the beads from the stocking and wet them again

11.   Rub each one between the palms of your hands using a circular motion to smooth the fibres

12.   Leave the beads to dry
 
 Once you have made all the felt beads you want, leave them to dry and then string them into a one of a kind necklace.

Enjoy!


Tuesday, June 26, 2012

Blankets for Babies

the welcoming committee

Last week we were back in Ratanda delivering more blankets to pre-school children and not too soon either, the cold is really here. The school,we went to, Ratanda Day Care, is run by Maria Dlamini who started it to take care of the many children in the informal settlement during the day. Parents who work pay R120.00 per month and Maria gets a subsidy of R4.50 per child. Each child is given 4 meals a day, breakfast, lunch and 2 snacks, leaving very little for anything else and yet Maria and her staff have managed to keep their school going and provide care and education for 250 children every day. Starting in temporary buildings ( now home to the kitchen and staff room), they have managed to build brick class rooms and are in the process of having an admin block built, but still have a long way to go. The classrooms have no ceilings so are not well insulated and so cold in the winter. The blankets we collected will go a long way to keeping the children warm.

When we arrived, there was a welcoming committee waiting at the gate to escort us in and then we were treated to a lovely concert put on by the children.

A huge thank you to The Land Cruiser Club and to Jo Jenkinson for collecting the majority of the blankets and to everyone else who so kindly made and sent blankets for these kids.

As promised, we put all the contributors names in a hat and the ColourSpun voucher was won by Mrs. I Hansen from Observatory.

I was so impressed by the efforts that Maria has made to care for these children that I'd like to help her make their environment better. They need ceilings in the class rooms, roofing materials, doors and windows for the new block, grass for the play ground.....

If anyone can help in any way or if you know someone who can, please contact me and I'll put you in touch with Maria.

happy faces

Jo, handing out blankets


Thursday, June 7, 2012

Craftsy

Hi Everyone,

I've recently discovered Craftsy, a wonderful website for crafters! I've already loaded a number of projects onto my store there and will be adding more regularly, so keep checking to see whats new. All the patterns there are printer friendly so that solves the problems that have been encountered by people trying to print from here :)

To reach my store, just click on my Craftsy label in the right hand column of my blog.

Here are some of the paterns I've already loaded